# Getting Started With Elasticsearch in Java Spring Boot
Both Java and Elasticsearch is a popular technology stack companies use. Java is a programming language that was released back in 1996. Currently, Java is acquired by Oracle and still in active development.
Elasticsearch is a young technology when we compare it to Java, it has only released in 2010 (14 years younger than Java). It’s gaining popularity quickly and now used in many companies as a search engine.
Seeing how popular they are, I’m sure that many people and companies want to connect Java with Elasticsearch to develop their own search engine. In this article, I want to teach you how to connect Java Spring Boot 2 with Elasticsearch. We will learn how to create an API that will call Elasticsearch to produce results.
## Connecting Java with Elasticsearch
The first thing we must do to connect our Spring Boot project with Elasticsearch. The easiest way to do this is to use the client library provided by Elasticsearch, which we can just add to our package manager like Maven or Gradle.
For this article, we’ll use a `spring-data-elasticsearch` library provided by Spring Data, which also includes Elasticsearch’s high level client library.
### Starting our project
Let’s start by creating our Spring Boot project with [Spring Initialzr](https://start.spring.io/). I’ll configure my project to be like the picture below, since we’re going to use high-level client, then we can use a convenient library provided by Spring, “Spring Data Elasticsearch”:
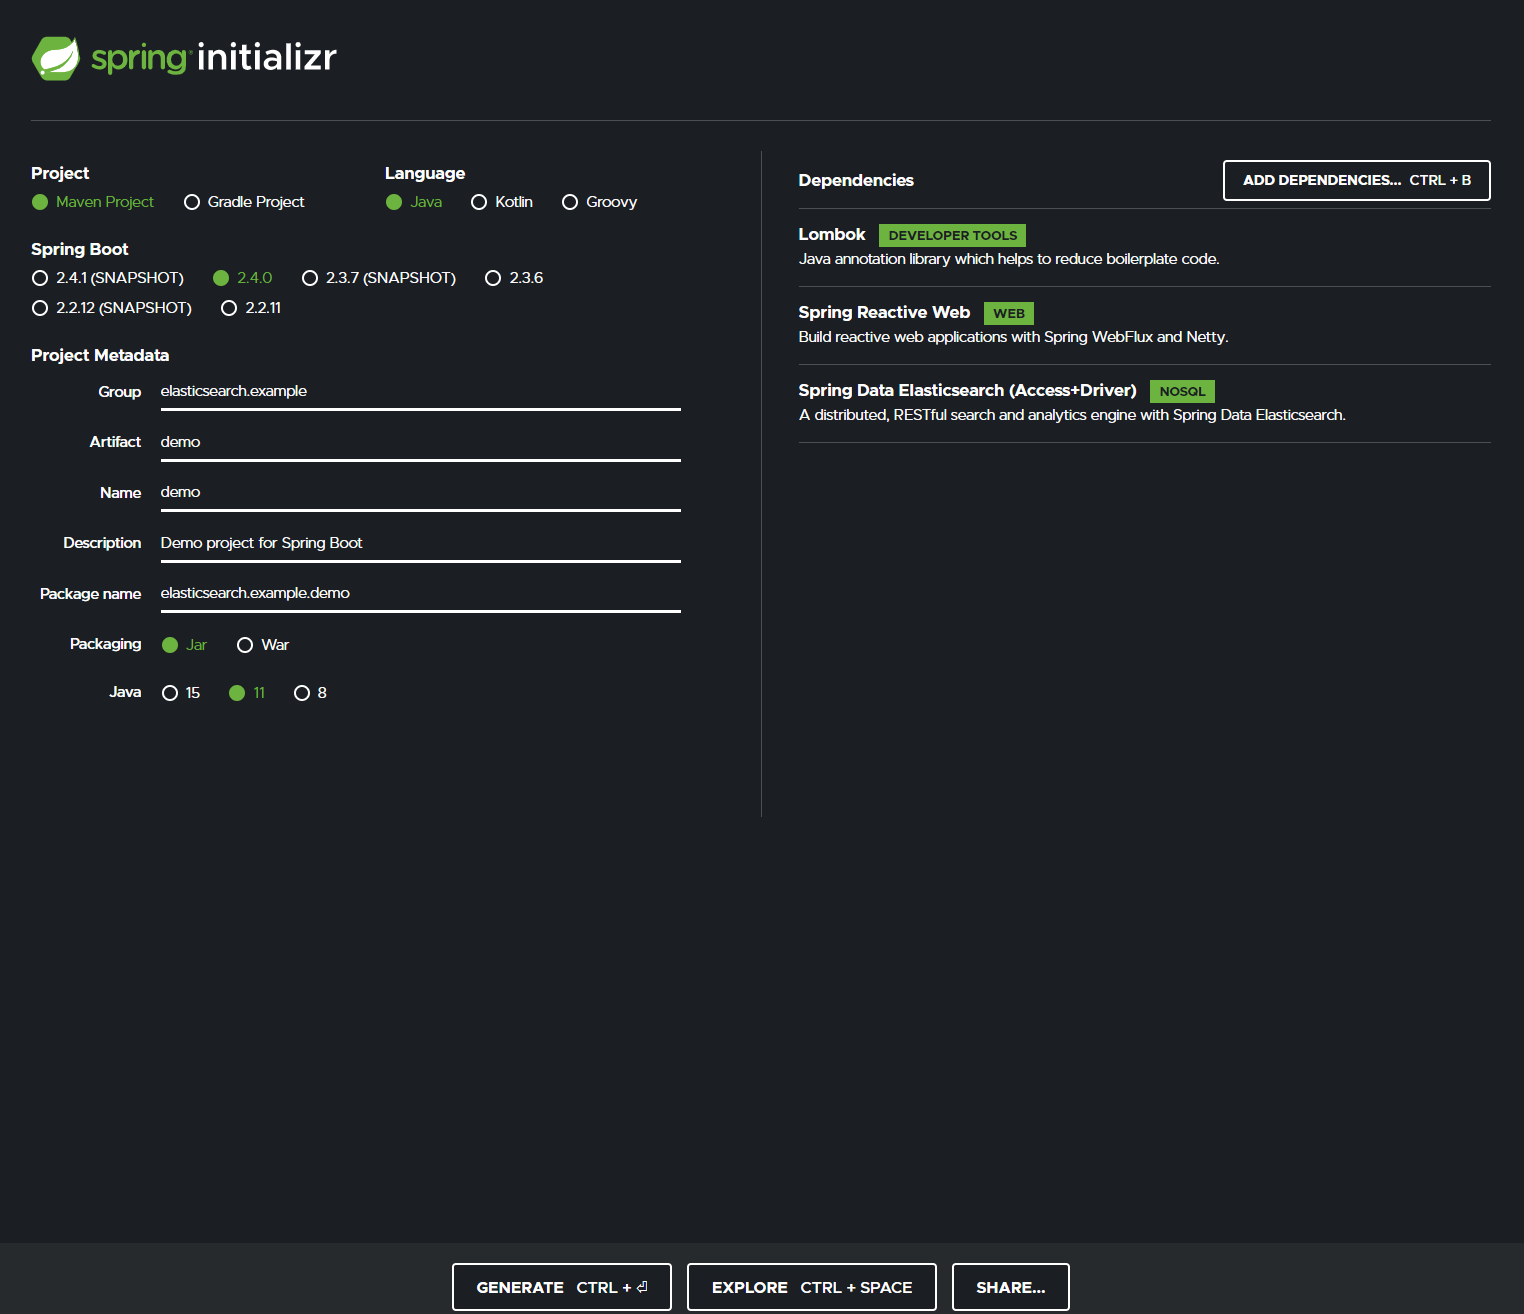
### Adding dependency to Spring Data Elasticsearch
If you followed my Spring Initialzr configuration in the previous section, then you should already have the elasticsearch client dependency in your project. But, if you don’t, you can add:
```xml
org.springframework.boot
spring-boot-starter-data-elasticsearch
```
### Creating Elasticsearch client's bean
There are 2 methods to initialize the bean, you can either use the beans defined in the spring data elasticsearch library or you can create your own bean.
The first and easy one is to use the bean configured by spring data elasticsearch.
For example, you can add these properties in your `application.properties`:
```properties
spring.elasticsearch.rest.uris=localhost:9200
spring.elasticsearch.rest.connection-timeout=1s
spring.elasticsearch.rest.read-timeout=1m
spring.elasticsearch.rest.password=
spring.elasticsearch.rest.username=
```
The second method is to create your own bean. You can configure the settings by creating `RestHighLevelClient` bean. If the bean is exist, the spring data will use it as its configuration.
```java
@Configuration
@RequiredArgsConstructor
public class ElasticsearchConfiguration extends AbstractElasticsearchConfiguration {
private final ElasticsearchProperties elasticsearchProperties;
@Override
@Bean
public RestHighLevelClient elasticsearchClient() {
final ClientConfiguration clientConfiguration = ClientConfiguration.builder()
.connectedTo(elasticsearchProperties.getHostAndPort())
.withConnectTimeout(elasticsearchProperties.getConnectTimeout())
.withSocketTimeout(elasticsearchProperties.getSocketTimeout())
.build();
return RestClients.create(clientConfiguration).rest();
}
}
```
### Testing the connection from our Spring Boot application to Elasticsearch
Your Spring Boot app and Elasticsearch should be connected now that you’ve configured the bean. Since we’re going to test the connection, make sure that your Elasticsearch is up and running!
To test it, we can create a bean that will create an index in the Elasticsearch in the `DemoApplication.class`. The class would look like:
```java
@SpringBootApplication
public class DemoApplication {
public static void main(String[] args) {
SpringApplication.run(DemoApplication.class, args);
}
@Bean
public boolean createTestIndex(RestHighLevelClient restHighLevelClient) throws Exception {
try {
DeleteIndexRequest deleteIndexRequest = new DeleteIndexRequest("hello-world");
restHighLevelClient.indices().delete(deleteIndexRequest, RequestOptions.DEFAULT); // 1
} catch (Exception ignored) {
}
CreateIndexRequest createIndexRequest = new CreateIndexRequest("hello-world");
createIndexRequest.settings(
Settings.builder().put("index.number_of_shards", 1)
.put("index.number_of_replicas", 0));
restHighLevelClient.indices().create(createIndexRequest, RequestOptions.DEFAULT); // 2
return true;
}
}
```
Okay, in that code we called Elasticsearch twice with the `RestHighLevelClient,` which we will learn later on in this article. The first call is to delete the index if it’s already exists. We used try catch that because if the index doesn’t exist then the elasticsearch will throw an error and failing our app starting process.
The second call is to create an index. Since I’m only running an 1 node Elasticsearch, I configured the shards to be 1 and replicas to be 0.
If everything went fine, then you should see the indices when you check your Elasticsearch. To check it, just go to [http://localhost:9200/\_cat/indices?v](http://localhost:9200/_cat/indices?v) and you can see the list of the indexes in your Elasticsearch:
```md
health status index uuid pri rep docs.count docs.deleted store.size pri.store.size
yellow open hello-world 0NgzXS5gRxmj1eFTPMCynQ 1 1 0 0 208b 208b
```
Congrats! You just connect your application to the Elasticsearch!!
* * *
## Another ways to connect
I recommend you to use `spring-data-elasticsearch` library if you want to connect to Elasticsearch with Java. But, in case that you can’t use the library, there is another way to connect your apps to Elasticsearch.
### High level client
As we know in the previous section, the `spring-data-elasticsearch` library we use also includes Elasticsearch’s high level client. If you’ve already imported `spring-data-elasticsearch`, then you can already use the Elasticsearch’s high level client.
If you want to, it’s also possible to use the high level client library directly without spring data’s dependency. You just need to add this dependency in your dependency manager:
```xml
org.elasticsearch.client
elasticsearch-rest-high-level-client
8.0.0
```
We’ll also use this client in our examples because the function in high level client is more complete than the `spring-data-elasticsearch.`
For more information, you can read [Elasticsearch documentation](https://www.elastic.co/guide/en/elasticsearch/client/java-rest/master/java-rest-high-getting-started.html).
### Low level client
Elasticsearch’s low level client. You’ll have a harder time with this library, but you can customize it more. To use it, you can add the following dependency:
```xml
org.elasticsearch.client
elasticsearch-rest-client
8.0.0
```
For more information, you can read [Elasticsearch documentation](https://www.elastic.co/guide/en/elasticsearch/client/java-rest/master/java-rest-low.html) about this.
### Transport Client
Elasticsearch also provides transport client, which will make your application identify as one of the node of Elasticsearch. I don’t recommend this method because it will be deprecated soon.
If you’re interested, you can read about transport client [here](https://www.elastic.co/guide/en/elasticsearch/client/java-api/current/transport-client.html).
### REST call
The last way to connect to Elasticsearch is by doing a REST call. Since Elasticsearch uses REST API to connect to its client, you basically can use a REST call to connect your apps to Elasticsearch. You can use OKHTTP, Feign or Web Client to connect your apps with Elasticsearch.
I also don’t recommend this method because it’s a hassle. Since Elasticsearch already provides client libraries, it’s better to use them instead. Only use this method if you don’t have any other way to connect.
* * *
## Using Spring Data Elasticsearch
First, let’s learn how to use `spring-data-elasticsearch` in our spring project. `spring-data-elasticsearch` is a very easy to use and high level library we can use to access the Elasticsearch.
### Creating entity and configuring our index
After we’re done connecting your apps with Elasticsearch, it’s time to create an entity! With spring data, we can add a metadata in our entity, which will be read by the repository bean we created. This way the code will be much cleaner and faster to develop since we don’t need to create any mapping logic in our service level.
Let’s create an entity called `Product`:
```java
@Data
@AllArgsConstructor
@NoArgsConstructor
@Builder
@Document(indexName = "product", shards = 1, replicas = 0, refreshInterval = "5s", createIndex = true)
public class Product {
@Id
private String id;
@Field(type = FieldType.Text)
private String name;
@Field(type = FieldType.Keyword)
private Category category;
@Field(type = FieldType.Long)
private double price;
public enum Category {
CLOTHES,
ELECTRONICS,
GAMES;
}
}
```
So let me explain what’s going on in the code block above. First, I won’t explain about `@Data` `@AllArgsConstructor` `@NoArgsConstructor` `@Builder` . They’re annotations from Lombok library for constructor, getter, setter, builder, and other things. If you don’t know about them yet, I urge you to [check it out](https://projectlombok.org/).
Now, let’s talk about the first spring data annotation in the Entity, `@Document` . `@Document` annotation show that the class is an entity containing a metadata of the Elasticsearch index’s setup. To use spring data repository, which we’ll learn later on, the `@Document` annotation is mandatory.
The only annotation that is mandatory in the `@Document` is the `indexName`. It should be pretty clear from the name, we should fill it with the Index name we want to use for the entity. In this article, we’ll use the same name as the entity, `product`.
The second parameter of the `@Document` to talk about is the `createIndex` parameter. If you set the `createIndex` as true, your apps will create an index automatically when you’re starting the apps if the index doesn’t yet exist.
`shards`, `replicas` and `refreshInterval` parameters determine the index settings when the index is created. If you change the value of those parameters after the index is already created, the settings won’t be applied. So, the parameters will only be used when creating the index for the first time.
If you want to use a custom id in the Elasticsearch, you can use `@Id` annotations. If you use the `@Id` annotations, spring data will tell Elasticsearch to store the id in the document and the document source.
The `@Field` type will determine the [field mapping](https://www.google.com/search?q=elasticsearch+mapping&oq=elasticsearch+mapping&aqs=chrome..69i57.2238j0j1&sourceid=chrome&ie=UTF-8) of the field. Like `shards`, `replicas` and `refreshInterval`, the `@Field` type will only affect Elasticsearch when first creating the index. If you add a new field or change types when the index is already created, it won’t do anything.
Now that we configured the entity, let’s try out the automatic index creation by spring data! When we configure the `createIndex` as true, spring data will check whether the index exists in Elasticsearch. If it doesn’t exist, spring data will create the index with the configuration we created in the entity.
Let’s start our apps, after it is running, let’s check the settings and see if it’s correct:
```bash
curl --request GET \
--url http://localhost:9200/product/_settings
```
The result is:
```json
{
"product": {
"settings": {
"index": {
"routing": {
"allocation": {
"include": {
"_tier_preference": "data_content"
}
}
},
"refresh_interval": "5s",
"number_of_shards": "1",
"provided_name": "product",
"creation_date": "1607959499342",
"store": {
"type": "fs"
},
"number_of_replicas": "0",
"uuid": "iuoO8lE6QyWVSoECxa0I8w",
"version": {
"created": "7100099"
}
}
}
}
}
```
Everything is as we configured! The `refresh_interval` is set to `5s`, the `number_of_shards` is 1 and `number_of_replicas` is 0.
Now let's check the mappings:
```bash
curl --request GET \
--url http://localhost:9200/product/_mappings
```
The result is:
```json
{
"product": {
"mappings": {
"properties": {
"category": {
"type": "keyword"
},
"name": {
"type": "text"
},
"price": {
"type": "long"
}
}
}
}
}
```
The mappings are also as we expected. It’s the same as we configured in the entity class!
### Basic CRUD with spring data repository interface
After we created the entity, we’ve everything we need to create a repository interface in Spring Boot. Let’s create a repository called `ProductRepository`. When you’re creating an interface, make sure to extend `ElasticsearchRepository`. In this case, the `T` object is your entity and `U` object type you want to use for the data id. In our case, since we’ll use `Product` entity, we created earlier than `T` and `String` as `U` .
```java
public interface ProductRepository extends ElasticsearchRepository {
}
```
Now, your repository interface is done, you don’t need to take care about the implementation because spring is taking care of that. Now, you can call every function in the classes that your repository extends to.
For the examples of CRUD, you can check the codes below:
```java
@Service
@RequiredArgsConstructor
public class SpringDataProductServiceImpl implements SpringDataProductService {
private final ProductRepository productRepository;
public Product createProduct(Product product) {
return productRepository.save(product);
}
public Optional getProduct(String id) {
return productRepository.findById(id);
}
public void deleteProduct(String id) {
productRepository.deleteById(id);
}
public Iterable insertBulk(List products) {
return productRepository.saveAll(products);
}
}
```
In the code blocks above, we created a service class called `SpringDataProductServiceImpl` which is autowired to `ProductRepository` we created before.
There are 4 basic CRUD function in it. The first one is `createProduct` which as its name will create a new product in the `product` index. The second one, `getProduct` is to get the product we’ve indexed by its id. The `deleteProduct` function can be used to delete the product in the index by id. `insertBulk` function will allow you to insert multiple products to Elasticsearch.
All is done! I won’t write about the API testing in this article because I want to focus about how our apps can interact with Elasticsearch. But, if you want to try the API, I left a GitHub link in the end of the article so you can clone and try this project after you’re done with this article.
### Custom query methods in the spring data
In the previous section, we only take advantage of using the basic methods that are already defined in the other classes. But we can also create a custom query methods to use. What’s very convenient about spring data is that you can make a method in the repository interface and you don’t need to code any implementation. Spring data library will read the repository and automatically create the implementations for it.
Let’s try searching for products by the `name` field:
```java
public interface ProductRepository extends ElasticsearchRepository {
List findAllByName(String name);
}
```
Yes, that’s all you need to do to create a function in spring data repository interface.
You can also define a custom query with `@Query` annotation and insert a JSON query in the parameters.
```java
public interface ProductRepository extends ElasticsearchRepository {
List findAllByName(String name);
@Query("{\"match\":{\"name\":\"?0\"}}")
List findAllByNameUsingAnnotations(String name);
}
```
Both of the methods we’ve created do the same thing, use the match query with name as its parameter. If you try it, you’ll get the same results.
### Using ElasticsearchRestTemplate
If you want to do a more advanced query, like aggregations, highlighting or suggestions, you can use `ElasticsearchsearchRestTemplate` provided by the spring data library. By using it, you can create your own query as complex as you want.
For example, let’s create a function for doing a match query to the `name` field like before:
```java
public List getProductsByName(String name) {
Query query = new NativeSearchQueryBuilder()
.withQuery(QueryBuilders.matchQuery("name", name))
.build();
SearchHits searchHits = elasticsearchRestTemplate.search(query, Product.class);
return searchHits.get().map(SearchHit::getContent).collect(Collectors.toList());
}
```
You should notice that the code above is more complex than the one we defined in the `ElasticserchRepository`. It is recommended to use the spring data repository if you can. But, for more advanced query like aggregation, highlighting or suggestions, you must use the `ElasticsearchRestTemplate`.
For example, let’s write a code that will aggregate a term:
```java
public Map aggregateTerm(String term) {
Query query = new NativeSearchQueryBuilder()
.addAggregation(new TermsAggregationBuilder(term).field(term).size(10))
.build();
SearchHits searchHits = elasticsearchRestTemplate.search(query, Product.class);
Map result = new HashMap<>();
searchHits.getAggregations().asList().forEach(aggregation -> {
((Terms) aggregation).getBuckets()
.forEach(bucket -> result.put(bucket.getKeyAsString(), bucket.getDocCount()));
});
return result;
}
```
* * *
### Elasticsearch RestHighLevelClient
If you’re not using spring, or your spring version doesn’t support `spring-data-elasticsearch`, you can use a Java library developed by Elasticsearch, `RestHighLevelClient`.
`RestHighLevelClient` is a library you can use to do from basic things like CRUD to managing your Elasticsearch. Even though the name is high level, it’s actually more low level if you compare it to `spring-data-elasticsearch`.
The advantage of this library over spring data is that you can also manage your Elasticsearch with it. It provides index and elasticsearch configuration, which you can use more flexibility compared to spring data. It’s also has a more complete function that interact with Elasticsearch. The disadvantage of this library over spring data is this library is more low level, which means you must code more.
### CRUD with RestHighLevelClient
Let’s see how we can create a simple create a function with the library so we can compare it to the previous methods we’ve used:
```java
@Service
@RequiredArgsConstructor
@Slf4j
public class HighLevelClientProductServiceImpl implements HighLevelClientProductService {
private final RestHighLevelClient restHighLevelClient;
private final ObjectMapper objectMapper;
public Product createProduct(Product product) {
IndexRequest indexRequest = new IndexRequest("product");
indexRequest.id(product.getId());
indexRequest.source(product);
try {
IndexResponse indexResponse = restHighLevelClient.index(indexRequest, RequestOptions.DEFAULT);
if (indexResponse.status() == RestStatus.ACCEPTED) {
return product;
}
throw new RuntimeException("Wrong status: " + indexResponse.status());
} catch (Exception e) {
log.error("Error indexing, product: {}", product, e);
return null;
}
}
}
```
As you can see, it’s now more complicated and harder to implement. Now, you need to handle the exception and also convert the JSON result to your entity. It’s recommended to use spring data instead for basic CRUD because `RestHighLevelClient` is more complicated.
I’ve included another CRUD functions in the GitHub project. If you’re interested, you can check it out. The link is at the end of this article.
### Index Creation
This section is where the `RestHighLevelClient` holds a clear advantage compared to spring data elasticsearch. When we’re creating an index with its mappings and settings in the previous section, we’ve only used annotations. It’s very easy to do, but you can’t do much with it.
With `RestHighLevelClient`, you can create methods for index managements, or basically almost anything that Elasticsearch REST API allows.
For example, let’s write a code that will creates `product` index with the settings and mappings we used before:
```java
public boolean createProductIndex() {
CreateIndexRequest createIndexRequest = new CreateIndexRequest("product");
createIndexRequest.settings(Settings.builder()
.put("number_of_shards", 1)
.put("number_of_replicas", 0)
.put("index.requests.cache.enable", false)
.build());
Map> mappings = new HashMap<>();
mappings.put("name", Collections.singletonMap("type", "text"));
mappings.put("category", Collections.singletonMap("type", "keyword"));
mappings.put("price", Collections.singletonMap("type", "long"));
createIndexRequest.mapping(Collections.singletonMap("properties", mappings));
try {
CreateIndexResponse createIndexResponse = restHighLevelClient.indices()
.create(createIndexRequest, RequestOptions.DEFAULT);
return createIndexResponse.isAcknowledged();
} catch (Exception e) {
e.printStackTrace();
}
return false;
}
```
So let’s see what we did in the code:
1. We initialized the `createIndexRequest` when also determining the index name.
2. We added the settings in the request when calling [`createIndexRequest.settings`](https://codecurated.com/blog/how-to-connect-java-with-elasticsearch/createIndexRequest.settings). In the settings, we also configured the field [`index.requests.cache.enable`](https://codecurated.com/blog/how-to-connect-java-with-elasticsearch/index.requests.cache.enable), which is not possible with spring data library.
3. We made a `Map` containing the properties and mappings of the fields in the index.
4. We called the Elasticsearch with [`restHighlevelClient.indices.create`](https://codecurated.com/blog/how-to-connect-java-with-elasticsearch/restHighlevelClient.indices.create)
As you can see, with the `RestHighLevelClient` we can create a more customized call for creating index to Elasticsearch compared to the annotations in spring data entity. There are also many more function in the `RestHighLevelClient` that aren’t exist in the spring data library. You can read [Elasticsearch’s documentation](https://www.elastic.co/guide/en/elasticsearch/client/java-rest/current/java-rest-high.html) for more information about the library.
* * *
## Conclusion
In this article, we’ve learned two ways to connect to Elasticsearch, by using spring data and Elasticsearch client. Both are powerful library, but you should use only the spring data if it’s possible for your use case. The code with spring data elasticsearch is more readable and easy to use.
If you want a more powerful library that can basically do anything the Elasticsearch allows, though, then you can also use Elasticsearch high level client. You can also use the low level client, which we didn’t cover in this article, if you need even more powerful feature.
I’d also like to say that this article is to help you get started with Elasticsearch in Java Spring Boot. If you want to learn more about the libraries, you can check out [spring data elasticsearch documentation](https://docs.spring.io/spring-data/elasticsearch/docs/current/reference/html/#new-features) and [Elasticsearch’s high level client documentation](https://www.elastic.co/guide/en/elasticsearch/client/java-rest/current/java-rest-high.html).
Alas, thank you for reading until the end!
Previously published at [Code Curated](https://codecurated.com/blog/how-to-connect-java-with-elasticsearch/)!